
My last tip went into the secret recipe for using the shaker egg (here). Today we’ll move on to the next step.
Let’s assume our vibrato novice has now gotten a good oscillation with just the hand and egg. Our next challenge is getting the hand to oscillate while the thumb doesn’t.
A simple hand oscillation is fairly natural. It’s basically learning how to use your hand like a seesaw. But it turns out when the thumb is immobilized, the hand immediately freaks out (so to speak) and assumes it can’t move either.
Vibrato Articles
Part 1: Introduction
Part 2: Upgrading the Shaker Egg
Part 3: Thumb Swings (this article)
That’s one reason so many students resort to moving their wrist. Just to get something to move! Because when does the hand ever move without the thumb?
(While this was a rhetorical question, the astute reader may answer, “When a very young child is sucking their thumb while waving goodbye to their parent as they rush out the door.” If this crossed your mind, you are totally right. More on the thumb-sucking later … it is actually going to come in handy.)
But first, let’s talk about how to train the hand to oscillate while the thumb stays stationary.
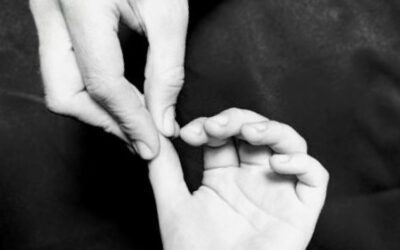
Here is the exercise: Place your violin arm approximately in playing position. It’s fine if it’s somewhat in front of you. Now, reach your bow arm up and over and use your fingertips to pin the tip of your left thumb. Now, with the thumb pinned, bob the hand forward and back.
Did you try it? Easy, right? Maybe … but only because you’re a teacher. 😉

Setting up thumb swings with a young student. (The parent will hold the tip of the thumb.)
There are three big things to watch for as you do this exercise:
- The thumb should stay very close to the palm. (Pulling it down will restrict the movement.)
- The hand should align with the arm. This means the thumb should be on the left.
- The arm should support its own weight (i.e., don’t hang from the thumb.)
Now, as promised, let’s return to our thumb-sucking young friend …
An easy preliminary version of this exercise is actually to bite the tip of your thumb between your teeth and wave. In this position, it is basically impossible to do anything other than the correct motion. This modification can be used to “prime” the official — and trickier — version of the exercise, in which several elements must be managed consciously to work properly.
When I added this simple yet challenging exercise, it immensely reduced the randomness and troubleshooting needed throughout the vibrato learning process! It is a huge part of how my students are able to achieve a relaxed, consistent vibrato relatively quickly and effortlessly. Let me know how it goes for you!
Looking for Suzuki Violin Lessons in Austin?
At Enchanted Wood Suzuki Studio, we specialize in guiding young beginners and their parents through every stage of learning the violin. Whether you live in North Austin, Cedar Park, or Round Rock, our studio provides a warm, structured environment where parents and children thrive together.
Ready to get started? Contact our Austin violin teachers today to learn more about violin lessons at Enchanted Wood.
0 Comments